In today’s fast-moving digital world, you face websites that are more interactive, more complex, and more data-rich than ever before. To truly master the web, you must go beyond clicking and typing—you need the ability to automate. This is where Puppeteer becomes your powerful ally.
Developed by the Chrome team, Puppeteer gives you full programmatic control over the browser using Node.js, enabling you to perform tasks like web scraping, UI testing, and performance auditing with ease and precision. Whether you’re a curious beginner or switching from tools like Selenium, Puppeteer offers a more modern, stable, and developer-friendly experience.
In this guide, you will learn not just how Puppeteer works, but also how to use it effectively to automate even the most complex browser workflows. Prepare to unlock a world where efficiency, consistency, and browser intelligence are fully in your hands. The future of automation starts with you.
1. What is Puppeteer?
- Puppeteer is a tool that lets you control a browser (like Chrome) using JavaScript code. You can use it to open websites, click buttons, or take screenshots—all without using a mouse or keyboard. It usually runs in headless mode, which means the browser works in the background without showing a window, but you can also run it with a visible screen. Puppeteer is built on Node.js and is great for testing or automating tasks.
1.1 Key Features:
a. Automate form submissions
- You can use Puppeteer to fill out and submit forms on websites automatically. For example, if you need to log in to a site or sign up many users, you don’t have to type each time. Instead, you can write a script that does it for you. This helps you save time and avoid manual work, especially when testing how forms behave or sending large amounts of data to a web page.
b. Take screenshots and generate PDFs
- Puppeteer lets you take screenshots of web pages or turn them into PDFs. You can use this for recording bugs, sharing website designs, or saving web content for later. You just give a few simple commands, and Puppeteer will capture the page exactly as it looks. This is really helpful for design reviews, documentation, or showing others what a web page looks like without sending a link.
c. Test web applications (UI testing)
- With Puppeteer, you can test how your web application looks and works, just like a user would. This is called UI testing. You write scripts to click buttons, check messages, or see if something loads properly. This helps you find bugs early and makes sure your site works well on different browsers or updates. It’s like having a robot tester that does the same actions over and over for you.
d. Crawl single-page apps (SPAs)
- Puppeteer can crawl or go through single-page applications (SPAs), which load content without changing the page. Many tools can’t read SPAs easily, but Puppeteer can wait for everything to load and then collect the data. This is great if you want to analyze content, test how your app loads, or build a search engine for your site. You get full control of what loads and when.
e. Scrape structured data
- You can use Puppeteer to scrape data from websites, like product names, prices, or articles. It helps you collect information from web pages, even when the data is hidden behind JavaScript. You write a script to find and copy specific parts of a page. This is useful for building reports, doing research, or tracking changes on websites. Just make sure you follow site rules while scraping.
f. Emulate devices and networks
- Puppeteer lets you pretend to be different devices (like phones or tablets) and slow internet connections. This means you can test how your site looks on an iPhone or behaves with 3G speeds. It helps you make sure your site is mobile-friendly and loads well even with poor network conditions. This is a great way to improve user experience for everyone, no matter what device or internet they use.
Summary:
- Puppeteer is known for its stability and consistency, which means it works the same way every time. This makes it great if you’re building automation pipelines—scripts that run tasks like testing or data collection over and over. You don’t have to worry about random errors or things breaking suddenly. As a developer, you can trust Puppeteer to handle your tasks reliably. It helps you save time, avoid bugs, and build tools that work smoothly every time.
2. Why Use Puppeteer for Browser Automation?
- You should use Puppeteer because it’s fast, easy to use, and works great with modern websites. Unlike older tools like Selenium, Puppeteer is more reliable and made for headless Chrome. If you want smooth browser automation for tasks like testing, scraping, or screenshots, Puppeteer gives you better control and fewer errors in your scripts.
2.1 Benefits of Puppeteer:
a. Full Chrome API Control
- With Puppeteer, you get full control over Chrome’s internal features using the DevTools Protocol. This means you can do advanced stuff like watching how pages load, checking performance, or blocking certain files. You’re not just clicking buttons—you’re getting access to what real developers use to debug and optimize websites. This gives you powerful tools to build smarter automation scripts that go way beyond basic browser actions.
b. Faster Execution
- Puppeteer runs in headless mode, which means it doesn’t open the browser window. Because of this, it runs much faster. If you’re testing or scraping a lot of pages, this speed really helps. You can finish tasks quickly without wasting time or computer power. It’s great for saving both time and resources, especially when you’re working with large projects or need to run tests regularly.
c. Modern JS Support
- If you’re building or testing websites made with modern frameworks like React, Vue, or Angular, Puppeteer is the perfect match. It supports modern JavaScript features and can handle pages that load content dynamically. This means your scripts will work smoothly with today’s most popular web apps. You don’t have to worry about old limitations—Puppeteer understands how modern websites work and helps you automate them the right way.
d. Screenshot & PDF Support
- Puppeteer can easily take screenshots or turn pages into PDFs. This is super useful if you want to show what a page looks like, record bugs, or save content. You can capture the full page or just a part of it, with high accuracy. It’s a great tool for designers, testers, or anyone who needs visual proofs of how a site looks at any moment.
e. Built-in Wait Mechanisms
- Sometimes, websites take time to load elements like buttons or images. Puppeteer has built-in wait functions that help you pause your script until things are ready. This avoids errors and makes your automation more stable. Instead of guessing with time delays, Puppeteer waits for the right moment. This makes your testing and scraping scripts much more reliable and smooth, especially on pages with dynamic content.
2.2 Use Cases:
a. Web Scraping – Clean DOM parsing, headless performance
- You can use Puppeteer to scrape data from websites quickly and cleanly. It lets you grab only the useful parts of a page using DOM parsing, which means you can find the exact text or links you need. Since it runs in headless mode, it’s also much faster. This helps when you’re collecting data from many pages. You get clean results and efficient performance without even opening a browser window.
b. UI Testing – Consistent rendering and element interaction
- Puppeteer is great for UI testing because it loads websites the same way every time. You can test how pages look and how buttons, forms, or other parts behave. It interacts with page elements just like a real user would. This helps you find bugs and check if everything works across updates. It gives you consistent results, which means fewer surprises when you make changes to your site.
c. Performance Auditing – Access to Lighthouse via Puppeteer
- If you want to test how fast and efficient your website is, Puppeteer can use Lighthouse, a tool that checks performance. You can run audits directly from your script to measure things like load time, accessibility, and best practices. This helps you find out what’s slowing your site down and how to fix it. You get real, useful performance scores without doing everything manually, making your site better for users.
d. SEO Audits – Screenshot and crawl SPA content
- Many modern sites use single-page apps (SPAs), which are hard for search engines to read. Puppeteer helps by crawling content after everything loads and even taking screenshots. This shows you what search engines and users actually see. It’s useful for checking if your site is SEO-friendly. You make sure all important content is loaded and visible, which helps your site rank better on Google and other search engines.
| Use Case | Puppeteer Benefit |
|---|---|
| Web Scraping | Clean DOM parsing, headless performance |
| UI Testing | Consistent rendering and element interaction |
| Performance Auditing | Access to Lighthouse via Puppeteer |
| SEO Audits | Screenshot and crawl SPA content |
3. Setting Up Puppeteer
- Let’s get you started on the right foot with Puppeteer setup.
3.1 Prerequisites:
a. Node.js (v14+ recommended)
- You need to have Node.js installed on your computer to use Puppeteer. It’s a tool that lets you run JavaScript outside the browser, which is what Puppeteer scripts use. You should install version 14 or higher to make sure everything works smoothly. With Node.js, you can write and run automation scripts, manage packages, and handle all the things Puppeteer needs to control the browser through your code.
b. NPM or Yarn
- You also need a package manager like NPM (Node Package Manager) or Yarn. These tools help you download, install, and manage Puppeteer and other libraries in your project. When you use a command like “
npm install puppeteer“, it’s NPM that handles everything for you. If you prefer Yarn, it works the same way. These tools make it super easy to set up and maintain your automation scripts.
4.1 Installation

- To install Puppeteer, you just need to open your terminal and run the command
**npm install puppeteer**. This will download Puppeteer along with a recent version of Chromium, which is the browser it uses. You don’t have to set up anything extra. Puppeteer does this to make sure everything is compatible and works perfectly. Once it’s installed, you’re ready to start writing scripts to automate, test, or scrape websites easily. It’s quick and beginner-friendly.
4.2 First Script
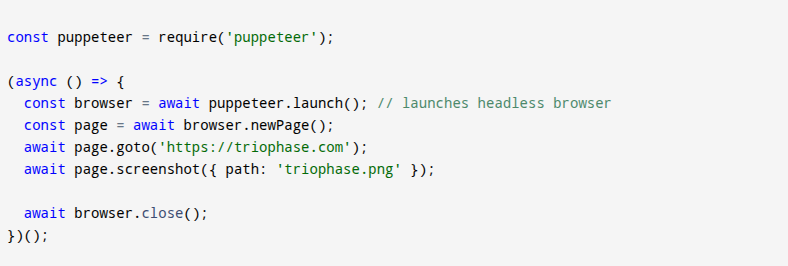
Create a file index.js:
Explanation of the above code:
-
- 1. const puppeteer = require(‘puppeteer’): First, you import Puppeteer into your script so you can use its features to control the browser.
-
- 2. (async () => { : This starts an async function, which lets you use await to pause and wait for tasks to finish one by one.
-
- 3. const browser = await puppeteer.launch(): You launch a new browser in the background (headless means no window shows). This opens the browser for you to control.
-
- 4. const page = await browser.newPage(): You create a new tab in the browser to visit websites or run actions.
-
- 5. await page.goto(‘https://triophase.com’): You tell the tab to go to the website at the address ‘https://triophase.com’.
-
- 6. await page.screenshot({ path: ‘triophase.png’ }): Now, you take a screenshot of the page through this command and save it as a file named ‘triophase.png’ on your computer.
-
- 7. await browser.close(): After taking the screenshot and saving the file to your existing storage, you need to finish the script. This command allows you to close the browser, completing the script and freeing up your computer’s resources.
-
- 8. })(): This ends the async function and runs the whole script automatically.

- After completing the writing of your first script, now open your terminal and type **node index.js**. This tells your computer to execute the file you created. When you do this, Puppeteer will open the browser, go to triophase.com, and take a screenshot for you automatically. After the script finishes, you’ll find a file named triophase.png in your folder.
- Boom! You just captured a real screenshot using code, all by yourself, without clicking anything manually. It’s a simple but powerful way to automate tasks
5. Core Concepts and Features
5.1 Launching and Closing the Browser

- When you write
**const browser = await puppeteer.launch({ headless: false })**, you’re telling Puppeteer to open the browser with a visible window. By setting headless: false, you can see everything happening, like the website loading. This helps when you want to watch your script in action. Later, when you run**await browser.close()**, it shuts down the browser after your task is done. This keeps things clean and saves computer memory. Always remember to close the browser when your work is finished.
5.2 Opening Pages

- When you write
**const page = await browser.newPage()**, you’re telling Puppeteer to open a new tab in the browser, just like when you click “+” in Chrome. Then,**await page.goto('https://triophase.com')**tells that tab to visit a website—in this case, triophase.com. Puppeteer waits for the page to fully load before moving on. This is how you automate web browsing, letting your code open and interact with websites just like a real person would, but without needing to click anything yourself.
5.3 Taking Screenshots and PDFs

- When you write
**await page.screenshot({ path: 'triophase.png' })**, Puppeteer takes a picture of the website and saves it as triophase.png. It’s like taking a photo of your screen using code. Then,**await page.pdf({ path: 'triophase.pdf' })**turns the whole page into a PDF file called triophase.pdf. This is super useful if you want to save how a page looks or share it later. You don’t need extra tools—just your script and Puppeteer do it all for you.
5.4 Interacting with Elements

- When you write
**await page.type('#username', 'john')**, Puppeteer finds the input box with the ID #username and types “john” into it, just like you would with a keyboard. Then,**await page.click('#login-button')**finds the login button and clicks it. This lets your script interact with websites, like filling out forms or logging in. You don’t have to move your mouse or type anything—Puppeteer does it for you. It’s like having a robot user follow your exact steps automatically.
5.5 Waiting for Elements

- When you use
**await page.waitForSelector('#dashboard')**, you’re telling Puppeteer to pause and wait until the #dashboard element shows up on the page. This is important for websites that load content slowly or with JavaScript. Instead of guessing how long to wait, Puppeteer watches for the exact element. This helps your script avoid errors and makes sure the page is fully ready before doing the next action. It’s like saying, “Wait here until the thing I need is actually there.”
6. Basic Use Cases for Puppeteer
6.1 Take Screenshots
- Using Puppeteer is super useful when you need to do UI testing, make documentation, or take website snapshots. You can check if buttons work, capture how a page looks, or save a website’s state for later. It helps you spot bugs, record designs, and automate visual tasks—all without doing things by hand every time.

- When you write
**await page.screenshot({ fullPage: true, path: 'full.png' })**, Puppeteer takes a full-page screenshot—not just what’s visible on the screen, but the entire webpage from top to bottom. It saves the image as full.png. This is super useful for UI testing, making documentation, or saving a snapshot of a site. You can easily check how everything looks or share it with your team, all done through a simple automated script—no manual screenshots needed!
6.2 Web Scraping Example

- When you write
**const data = await page.evaluate(() => { return document.querySelector('h1').innerText; })**, you’re telling Puppeteer to go inside the webpage and grab the text inside the first<h1>tag. This is called web scraping—you’re using code to pull data from a site. The text is saved in the data variable, and you can use it however you want. It’s super helpful when you need to collect content from websites automatically without copying things by hand.
6.3 Generate PDFs

- When you write
**await page.pdf({ path: 'report.pdf', format: 'A4' })**, Puppeteer takes the entire webpage and turns it into a PDF file named report.pdf. The format: ‘A4’ part makes sure the page size matches standard A4 paper. This is great when you want to save content, share reports, or create printable versions of web pages. You don’t need to print and scan anything—Puppeteer does it for you with just one line of code. It’s fast, simple, and super useful.
6.4 Automate Forms

- When you write
**await page.type('#search', 'Puppeteer tutorials')**, you’re telling Puppeteer to find the search box with ID #search and type “Puppeteer tutorials” into it. Then,**await page.keyboard.press('Enter')**tell it to press the Enter key, just like you would when starting a search. This is how you can automate typing and key presses on websites. It’s super useful for testing search bars or simulating real user actions without actually using your keyboard or mouse.
7. Advanced Use Cases and Integrations
7.1 Looping Through URLs

- You have a list of URLs in
urlsyour like ‘https://a.com’ and ‘https://b.com’. The for loop goes through each URL one by one. For every URL, Puppeteer uses **await page.goto(url)** to open that website. Then it takes a screenshot of the page with**await page.screenshot()**. The screenshot is saved with a name based on the URL, likea.pngorb.png. This way, you can automate visiting multiple websites and saving pictures of each one without repeating code manually. It’s a powerful way to work with many pages quickly!
7.2 Crawl SPAs

- Puppeteer is really good at handling SPAs (Single-Page Applications) that use a lot of JavaScript to load content. Sometimes, these pages take time to fully show everything. When you write
**await page.waitForFunction('window.__RENDERED__ === true')**, Puppeteer waits until the webpage sets a special flag called RENDERED to true. This means the page has finished loading all its content. By waiting for this, your script won’t move too early and can work with the complete, fully loaded page every time.
7.3 Network Interception

- When you write
"await page.setRequestInterception(true)", you tell Puppeteer to watch every network request the page makes. Then"page.on('request', req => {...})", you set a rule for these requests. If the request is for an image (checked byreq.resourceType() === 'image'Puppeteer will stop it withreq.abort(). For all other requests, it lets them continue normally usingreq.continue(). This helps you save bandwidth and speed up your script by blocking images, which aren’t always needed when you’re scraping or testing.
8. Troubleshooting Puppeteer Issues
8.1 Common Problems:
a. Timeouts:
- Sometimes, when Puppeteer tries to load a page, it takes too long or stops early. This happens because the page is still loading resources like images or scripts. To fix this, you use
**waitUntil: 'networkidle0'**in yourpage.goto()command. This means Puppeteer waits until no more network requests happen for a moment. That way, you know the page is fully loaded before your script continues, avoiding errors caused by unfinished loading.
b. Missing Chromium:
- Puppeteer automatically downloads a version of Chromium to work with. But sometimes, it skips this download, so the browser is missing. This usually happens if the environment variable
**PUPPETEER_SKIP_CHROMIUM_DOWNLOAD**is set to true. To fix this, you need to set it to false or remove it. That way, Puppeteer will download Chromium properly, and your scripts can launch the browser without errors.
c. Permission Denied:
- If you get a Permission Denied error when running Puppeteer, it means your computer won’t let your script access some files or folders. This often happens because of restricted folder permissions. To fix this, you can try running your script with
**sudo**(on Linux or macOS), which gives it higher access rights. Or, you can change the folder’s permissions so your user has read and write access. This lets Puppeteer work without permission problems.
8.2 Debugging Tips:
a. Add headless: false to see the browser:
- When Puppeteer runs in headless mode, the browser stays hidden—you can’t see what it’s doing. To watch the actions in real time, set
**headless: false**it when launching the browser. This way, you’ll see the actual browser window open, click buttons, fill forms, or take screenshots. It helps you debug your script by showing what’s really happening step by step, just like if you were using the browser yourself.
b. Use page.on('console') to log browser console:
- Sometimes you need to know what’s going on inside the webpage while your script runs. By writing
**page.on('console')**, you make Puppeteer listen to the browser’s console logs, just like using console.log in JavaScript. It shows messages printed by the page itself, such as errors or debug info. This helps you troubleshoot problems, understand page behavior, and catch issues that might not appear in your terminal. It’s like adding eyes and ears inside the browser.
9. Puppeteer vs. Alternatives (Selenium, Playwright)
9.1 Speed:
- When it comes to speed, Puppeteer is fast, which means your scripts run quickly. Selenium is a bit slower, especially with older setups. Playwright is very fast, often faster than both. So, if you want your browser tasks to finish quickly, Puppeteer and Playwright are great choices. They load pages, take screenshots, and run tests faster, which saves you time and helps your projects feel more responsive.
9.2 Modern JS Support:
- You work with websites using modern JavaScript, like React or Vue. Puppeteer and Playwright both handle this very well, so they’re great for modern web apps. Selenium supports JavaScript too, but not as smoothly—it’s more basic. If you want your tests or scraping to work perfectly with today’s interactive, JavaScript-heavy sites, Puppeteer and Playwright give you excellent support and make your life much easier when coding.
9.3 Multi-browser:
- Puppeteer mainly works with Chrome and Chromium. That’s great if you only need Chrome. But Selenium and Playwright support all major browsers—Chrome, Firefox, Safari, and even Edge. So, if you need to test your code on different browsers, Selenium or Playwright might be better. Puppeteer is great for speed, but Playwright is awesome if you want the same code to work everywhere.
9.4 Ease of Use:
- If you’re just starting out, Puppeteer is super easy to learn. Its code is clean, simple, and feels like writing regular JavaScript. Playwright is also easy to use, especially if you’ve used Puppeteer before. Selenium can be a little tricky and takes more time to understand. So, if you want something that’s beginner-friendly and quick to get working, Puppeteer gives you a smoother experience.
9.5 Community:
- When you run into problems, a strong community helps a lot. Selenium has the biggest community, since it’s been around for years. Puppeteer has a large community, too, with lots of tutorials and GitHub issues you can learn from. Playwright is newer but growing fast, and many developers love it. If you want help, answers, or examples, all three tools have support, but Selenium still leads in overall community size.
| Feature | Puppeteer | Selenium | Playwright |
|---|---|---|---|
| Speed | Fast | Moderate | Very Fast |
| Modern JS Support | Excellent | Decent | Excellent |
| Multi-browser | Chrome | All | All |
| Ease of Use | High | Moderate | High |
| Community | Large | Largest | Growing |
- If you want to automate tasks in Chrome, Puppeteer is a perfect tool for you. It’s easy to use, fast, and works really well with JavaScript-heavy websites. But if you need your script to run on multiple browsers like Firefox or Safari, not just Chrome, then you should look into Playwright. It’s also easy and powerful, but it works across more browsers. So, choose Puppeteer for Chrome-only tasks and Playwright if you want your code to work everywhere.
10. Best Practices for Puppeteer Automation
10.1 Use Selectors Wisely
- When you’re using Puppeteer to find elements on a page, always prefer CSS selectors instead of XPath. CSS selectors are easier to write, more reliable, and work better with most websites. XPath can break more easily if the page structure changes. By using stable CSS selectors, like IDs or class names, your script becomes more accurate and easier to fix later. So, to keep your automation smooth and simple, always try to use CSS selectors wisely for the best results.
10.2 Wait Smartly

- When you’re waiting for something to load on a webpage, don’t just add a hardcoded delay like
setTimeout. That can slow things down or break your script if the page loads faster or slower than expected. Instead, use**await page.waitForSelector('.loaded')**. This tells Puppeteer to wait until a specific element appears on the page. It’s a smarter and more reliable way to wait, because it only moves forward when the content is actually ready. Always try to wait smartly!
10.3 Handle Errors
- When something goes wrong in your Puppeteer script, like a page not loading or a button not being found, you should use a
**try...catch**block. This helps you catch errors instead of crashing your script. Inside thecatchpart, you can write code to take a screenshot, so you can see what the page looked like when the error happened. This makes it easier to debug and fix problems. Always remember to handle errors the smart way!
10.4 Headless Testing
- When you run your tests in a CI pipeline (like GitHub Actions or Jenkins), you won’t have a real screen to show the browser. That’s why you should set
**headless: true**. This makes Puppeteer run in the background without opening a browser window. It’s perfect for automated systems because it uses less memory, runs faster, and doesn’t need a display. So, for smooth, fast, and invisible testing in CI, always run your scripts in headless mode.
10.5 Organize Scripts
- When your Puppeteer scripts start getting bigger, it’s smart to organize your code. You should split your logic into reusable functions or separate modules. For example, if you take screenshots in many places, write a function just for that. This makes your code cleaner, easier to read, and much simpler to update later. Instead of repeating the same lines, you just call the function. So, always try to organize your scripts to keep your projects neat and professional.
11. Security Considerations
11.1 Never store credentials in scripts:
- You should never write your username or password directly inside your Puppeteer script. If someone sees your code, they can steal your login info. Instead, use environment variables or a secure way to load credentials safely. This keeps your accounts protected and your data safe. Remember, if your code gets shared or hacked, hardcoded credentials can be very dangerous—so always keep them out of your scripts.
11.2 Avoid opening unknown URLs:
- Never make your script open random or unknown URLs. Some websites can contain malware, trackers, or harmful scripts that could hurt your computer or steal your data. Only browse sites you trust and understand. Running unknown URLs through automation tools like Puppeteer can be risky because you’re giving those pages full access through your browser session. So, always stay safe and avoid clicking on suspicious links in your scripts.
11.3 Run scripts in sandboxed environments:
- It’s smart to run Puppeteer scripts inside a sandboxed environment—a safe space where nothing can harm your system. This could be a virtual machine, Docker container, or isolated test server. If something goes wrong, it won’t affect your real files or computer. Using sandboxing helps you contain risks and test safely. So, if you’re working on complex or risky automation tasks, always sandbox your scripts for extra protection.
11.4 Sanitize any scraped data before using or storing:
- When you collect data from websites using Puppeteer, always sanitize it first. That means you clean and check the data before saving or using it. Some websites can include malicious code in their content, which can harm your app or database. By sanitizing, you make sure the info is safe and clean, and only the parts you actually need. It helps keep your system secure and stable, especially when dealing with user-generated or unknown content.
12. Real-World Applications of Puppeteer
12.1 E-Commerce
- If you work on an e-commerce project, Puppeteer can help you in powerful ways. You can build a script to track prices on websites, so you always know when an item gets cheaper. You can also check product availability, like whether something is in stock or sold out. And if you want to beat your rivals, you can do competitor analysis by checking their prices, products, and changes. With Puppeteer, you get all this info automatically, saving you time and helping you make smarter business decisions. It’s a great tool for your online store strategy.
12.2 Media
- If you’re working in media or publishing, Puppeteer can really help you stay ahead. You can use it for content aggregation, which means collecting news or articles from different websites in one place. It also helps track your SEO performance by checking if your headlines, links, and keywords are showing up well on search engines. Plus, with screenshot-based monitoring, you can take regular pictures of your web pages to see how they look and if anything breaks. All of this makes it easier for you to manage and improve your online content automatically.
12.3 QA & Testing
- If you’re doing QA or testing, Puppeteer is a great tool for you. You can use it for UI regression testing, which means checking if your website looks the same after updates. It helps catch design bugs. You can also automate workflows, like clicking buttons and filling forms, to make sure everything works step by step. And if something goes wrong, Puppeteer can capture errors with screenshots, so you can see exactly what happened. This saves time and helps you find problems faster. With Puppeteer, your testing becomes smarter, faster, and more reliable.
12.4 Data Analytics
- If you’re into data analytics, Puppeteer can make your job much easier. You can use it for scraping dynamic tables from websites—those tables that change with clicks or load with JavaScript. Puppeteer waits for the content and then grabs the data for you. You can also use it to automate data extraction for your reports. That means you won’t have to copy and paste data manually. Just run your script, and Puppeteer collects the numbers for you. This saves you time and gives you clean, reliable data to work with in your analytics projects.
Final Thoughts
- As you step into the future of web automation, Puppeteer will remain one of your most reliable companions. In a world driven by dynamic content, JavaScript-heavy frameworks, and real-time user interactions, your ability to control the browser with precision will define the efficiency and quality of your digital solutions.
- Whether you’re building data pipelines, performing SEO audits, or running automated UI tests, Puppeteer empowers you with tools to scale effortlessly and innovate boldly. You are not just automating clicks—you are creating a smarter, faster, and more intelligent web experience. Start small, grow your skillset, and let Puppeteer guide you into a future where automation meets intelligence. The future belongs to developers who automate wisely, and with Puppeteer in your hands, that future starts with you.
Frequently Asked Questions (FAQs)
1. Is Puppeteer only for Chrome?
- A: Yes, Puppeteer is mainly designed to work with Google Chrome. But don’t worry—it also works with Chromium, which is the open-source version of Chrome. If you want, you can even set it up to run with Firefox, though that comes with some limitations and may not support all features. So, while Puppeteer is best with Chrome, you still have options. If you need full compatibility and stability, sticking with Chrome or Chromium is the smartest choice.
2. Is Puppeteer suitable for web scraping?
- A: Yes, Puppeteer is perfect for web scraping, especially when you’re dealing with SPAs (Single Page Applications) or websites that load content using JavaScript. Unlike basic tools that only grab static HTML, Puppeteer actually renders the page, just like a real browser. That means you can scrape dynamic content—like prices, headlines, or product info—without missing anything. If you’re serious about collecting accurate data from modern websites, Puppeteer gives you the power and control to do it smoothly and reliably.
3. How does Puppeteer compare to Selenium?
- A: Puppeteer is a faster and more modern tool compared to Selenium, especially when you work with JavaScript-heavy websites. It gives you a smooth experience, but it mostly works with Chrome or Chromium. On the other hand, Selenium is a bit older and slower, but it works with many different browsers like Firefox, Safari, and Edge. So if you want speed and simplicity, go with Puppeteer. But if you need cross-browser testing, then Selenium might be a better fit for you.
4. Can Puppeteer bypass CAPTCHA?
- A: No, Puppeteer can’t bypass CAPTCHA on its own. CAPTCHA is made to stop bots, so even smart tools like Puppeteer can get stuck. If you want to solve CAPTCHAs, you’ll need to use a third-party service like 2Captcha or Anti-Captcha, or solve them manually during automation. Puppeteer can help you detect the CAPTCHA and pause your script until it’s solved. So while Puppeteer is powerful, solving CAPTCHAs still needs extra tools or human help to work properly.
5. Is Puppeteer good for testing?
- A: Yes, Puppeteer is great for testing, especially when you want to do headless UI testing—that means testing websites without opening a browser window. It works smoothly with popular testing tools like Jest and Mocha, so you can easily run your tests in an automated way. You can check if buttons work, pages load, or errors show up—just like a real user would. If you want your site to be bug-free and fast, Puppeteer helps you test with confidence and control.